Marking anchor chain: six methods compared
Paint, chain markers, cable ties, whipping twine, tape or a chain counter: what stays on an anchor chain, what you can still find at night – and which scheme works.
The short answer
Mark the chain every 10 metres, measured from the anchor, and use two methods at once: one you can see from the bow in daylight – paint or coloured chain markers – and one you can feel with your hand at night, such as whippings of twine.
For the scheme, a count code works best: one mark at 10 m, two at 20 m, three at 30 m, four at 40 m and a long one at 50 m. It needs no legend, works with a single colour, and works in the dark.
No marking lasts forever. Check it every season, and expect to renew some of it.
Why mark it at all?
The rule of thumb for chain length – five times the height from the bow roller to the seabed, more in How much anchor chain for which depth? – is only useful if you know how much is out. Without marks all that is left is guessing: by feel, by the seconds the windlass runs, by the pile still sitting in the chain locker. How far off that is usually shows only when the anchor drags.
The scheme: colour code or count code
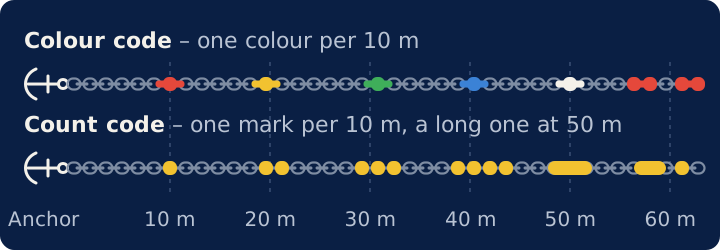
With a colour code, every ten-metre mark gets its own colour – red at 10 m, yellow at 20 m, green at 30 m, blue at 40 m and white at 50 m, say. From 60 m the colours start again, doubled. If you know the scheme, you read the length at a glance. If you don't – the crew, guests, you yourself after a winter ashore – you need a legend, ideally a laminated card by the anchor locker. And at dusk, red and brown, blue and green are easily confused, while about one man in twelve has red-green colour blindness.
With a count code, the number of marks is what counts: one at 10 m, two at 20 m, three at 30 m, four at 40 m. At 50 m there is a long mark across several links – the principle of the Roman five – at 60 m a long one and a single one, at 70 m a long one and two. The count code needs no legend and only one colour, and you can read it by touch. That is why we recommend it, with colour added if you like.
Two details make any scheme better:
- Measure from the anchor, starting at the shackle on the anchor shank. The 10 m mark sits 10 m behind the anchor. When it passes over the bow roller, there are 10 m of chain between the bow roller and the anchor – exactly the length the rule of thumb works with.
- Measure with a tape when the chain is all out anyway: laid along the pontoon, in the yard over winter, or when it is new. Counting links only works if you know the pitch of your chain; it is in the manufacturer's data sheet.
If you often anchor in shallow bays, you can add a small mark in a second colour at 5 and 15 m. Do not go further than that: nobody reads a scheme they first have to decode while the anchor is going down.
The six methods
1. Paint
Paint or spray paint over several links in a row, three to five links per mark. Clean the chain first, degrease it and let it dry; on galvanised steel, a primer made for zinc holds much better than paint alone. Several thin coats last longer than one thick one.
Paint is cheap and easy to see in daylight, even while the chain is running. Its drawback: the gypsy, the bow roller and the seabed wear it off, often within a single season. Flakes of paint end up in the chain locker, and at night you can hardly see it and cannot feel it at all.
2. Plastic chain markers
Coloured plastic or rubber inserts pressed into the opening of a chain link. They come sized to the chain, for 6, 8, 10 or 12 mm for example, usually in sets of several colours.
They are quick to fit, keep their colour, and can be felt a little. But the size has to be right: a marker too large jams in the gypsy, one too small falls out. Even one that fits can work loose over time. After fitting them, check that each one runs cleanly through the gypsy – slowly, with your hands well away from the gypsy and the chain.
3. Cable ties
Coloured cable ties are threaded through a link, pulled tight and cut off flush. In the count code, one cable tie is one mark.
Cable ties are available everywhere, cost next to nothing, and are easy to feel. On the other hand, UV light makes them brittle; black UV-resistant ties last longer than coloured ones. The cut ends are sharp enough to tear skin – cut them flush and turn the head inwards. An end that sticks out can catch in the gypsy.
4. Whippings of twine or thin line
Whipping twine or a thin line of 2 to 3 mm, wound several times through a link and knotted tight; synthetic fibre lasts longer than natural fibre. In the count code, one whipping is one mark; for the long mark, whip several links in a row.
Whippings are soft on the hands, easy to find by touch at night, and rarely come loose. Their drawback is the time it takes to make them, and over time they soak up mud and fade, so the colour is little help in daylight. As a second, tactile marking next to paint or chain markers, they are ideal.
5. Tape
Coloured electrical tape or another tape, wound around several links. Quick to apply, and easy to see on the first day.
On wet, rough, galvanised chain, though, tape holds badly: it bunches up, slips off and leaves adhesive behind. As a stopgap for a week – on a charter yacht with no marks, for instance – it will do; for good, it will not.
6. A fitted chain counter
A sensor on the windlass counts the turns of the gypsy, usually by means of a magnet, and a display at the helm or in the remote control converts them into metres. Windlass makers and accessory suppliers offer such counters.
A chain counter is accurate, at night too, and it shows the length where the boat is steered – nobody has to stand at the bow watching the chain. But it has to be installed: fit the sensor, often by drilling, run a cable through the boat, mount the display and calibrate it to the chain. With installation it usually comes to a few hundred euros, and it has to suit the windlass you have. And it counts turns, not chain: if the calibration is off, or the chain slips over a worn gypsy, the reading is wrong. Charter yachts rarely have one. How to do without the installation is shown in A chain counter without installation.
The comparison at a glance
| Method | Cost | Lasts | By day | At night | Effort |
|---|---|---|---|---|---|
| Paint | low | a season, often less | easy to see | not visible | medium |
| Chain markers | low | several seasons, if they fit | easy to see | can be felt a little | low |
| Cable ties | very low | about a season | fair | easy to feel | low |
| Whippings | low | several seasons | fade | easy to feel | high |
| Tape | very low | weeks | good at first | hard to feel | low |
| Chain counter | a few hundred euros | years | on the display | on the display | installation |
How long each lasts is a matter of experience. It depends a great deal on how often you anchor, on what kind of bottom, and on the gypsy the chain runs through.
What we recommend
- On your own boat: chain markers or paint for the eye in daylight, with whippings in the same count code beside them for the hand at night. Two methods rarely fail at the same time.
- On a charter yacht: at handover, ask whether the chain is marked, to which scheme, and how long it is in total. If it is not marked, agree with the charter company to fit cable ties in the count code, and take them off again when you return the boat.
- With a chain counter: mark the chain anyway. If the counter fails, or loses its zero after a voltage drop, the marks are still there.
The end of the chain
Mark the last 5 m conspicuously, red all the way along, for example. When you see that mark run over the bow roller, you know: there is no more.
The end itself should not be shackled to the bottom of the chain locker, but tied on with a line long enough to reach the deck. If the anchor has to be abandoned in an emergency, the line can be cut; if at all possible, tie a buoy to the chain first, so you can find it again later.
Marks do not last forever
- Check the marks every season, ideally when the chain is all out anyway, in the yard over winter or when the boat is lifted.
- When you turn the chain, move the marks. Many owners swap the ends after a few years, because the stretch nearest the anchor wears most. Since the marks are measured from the anchor, none of them is right afterwards. So plan the re-marking for the same day.
- After regalvanising, all the paint is gone and every marker is out. The scheme starts again from scratch.
And in between?
Even the best marking only tells you what is passing over the bow roller when a mark goes by. Between two marks you are guessing again, and someone has to stand at the bow and watch – at night with a head torch, in a swell with one hand for the boat.
That gap is what we are developing AnkerSepp for: a device that clips onto the windlass you already have and shows the chain paid out in metres, continuously, with no installation and no wiring. It is still a prototype. And even with it, we advise marking the chain – a second method that cannot fail is never out of place on board.